Instrumenting a software

Getting scrutiny-embedded

The Scrutiny instrumentation library is hosted on Github and uses CMake as build system.

Scrutiny is intended to work on embedded baremetal platforms, which may have uncommon architecture. For that reason, no prebuilt release of the instrumentation library is provided. As a developer, you will be required to build scrutiny-embedded yourself.

Scrutiny has some build options to enable/disables features.
The list of possible configurations are provided below

SCRUTINY_SUPPORT_64BITS (default 1)
When enabled, Scrutiny will be able to handle 64 bits types as RPV and as datalogging operand. Disabling that feature will not prevent memory inspection as they happen with raw memory dumps.
Disabling 64 bits support is mainly useful to reduce the memory footprint of the library on small microcontrollers.
SCRUTINY_ENABLE_DATALOGGING (default 1)
When enabled, embedded graphs will be possible. The datalogging feature requires a non-negligible ROM footprint which can be an issue on code size limited devices.
SCRUTINY_DATALOGGING_MAX_SIGNAL (default 32)
Maximum number of signal that can be simultaneously logged by the embedded datalogger.
SCRUTINY_DATALOGGING_BUFFER_32BITS (default 0)
Allow a datalogging buffer bigger than 65536 bytes.
SCRUTINY_REQUEST_MAX_PROCESS_TIME_US (default 100000)
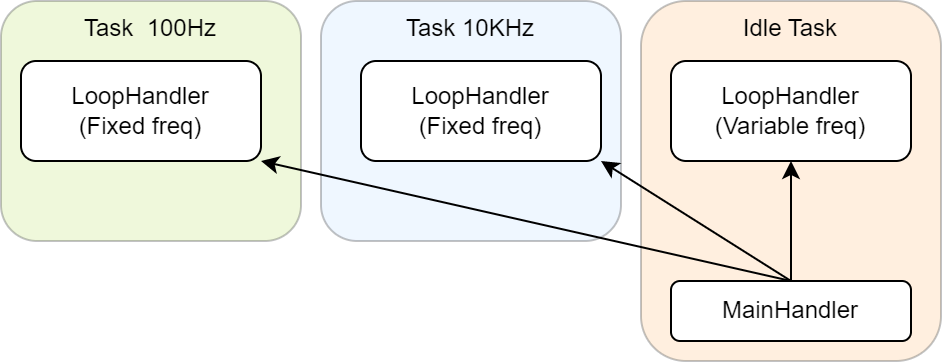
Maximum time allowed to internally process a request (us). This value has an effect on messages that needs to wait for a response from a LoopHandler (in a different thread). This delay may need to be extended if datalogging is enabled in a very slow thread/task.
SCRUTINY_COMM_RX_TIMEOUT_US (default 50000)
Maximum time between the reception of 2 consecutive bytes (us). This represent the minimum wait time to send a new request to the device if the previous request was incomplete. After that delay, the communication state machine goes back to IDLE and a new command is awaited.
SCRUTINY_COMM_HEARTBEAT_TIMEOUT_US (default 5000000)
Maximum amount of time between the reception of 2 heartbeat messages. If this delay is exceeded, the device will close the session with the server and will stop all communication. A new CONNECT message will be required to reenable the communication.

In-tree build

A simple in-tree build is possible by adding the scrutiny-embedded folder to your project.

git clone https://github.com/scrutinydebugger/scrutiny-embedded
#CMakeLists.txt
project(MyProject)

add_subdirectory(scrutiny-embedded/lib)
add_executable(${PROJECT_NAME} main.cpp)
target_link_libraries(${PROJECT_NAME} scrutiny-embedded)

Automating in-tree builds

It is possible to automate the process of fetching and configuring scrutiny using CMake FetchContent module. This method is the recommended one.


cmake_minimum_required(VERSION 3.14)
project(CMakeDemoProject)

include(FetchContent)

set(SCRUTINY_ENABLE_DATALOGGING 1)
set(SCRUTINY_SUPPORT_64BITS 0) 
# More options possible

FetchContent_Declare(
  scrutiny-embedded
  GIT_REPOSITORY https://github.com/scrutinydebugger/scrutiny-embedded.git
  GIT_TAG        v0.1
)
FetchContent_MakeAvailable(scrutiny-embedded)

add_executable(${PROJECT_NAME} main.cpp)

target_link_libraries(${PROJECT_NAME} PRIVATE 
    scrutiny-embedded
)

add_compile_options( -Os -Wall  -Wextra  -Werror  -gdwarf-4)    # These options also applies to scrutiny-embedded

Building out of tree

Another option would be to build the library as a standalone project, then adding the build byproduct to your project.

git clone https://github.com/scrutinydebugger/scrutiny-embedded
./scrutiny-embedded/scripts/build.sh

The static library and the include files will be located in scrutiny-embedded/build-dev/install. You can then copy the install folder content to your project, say in 3rdparty/scrutiny and link to the library like below, assuming the correct toolchain file is set for your device.

#CMakeLists.txt
project(MyProject)

add_executable(${PROJECT_NAME} main.cpp)

target_link_libraries(${PROJECT_NAME} 3rdparty/scrutiny/scrutiny-embedded.a)
target_include_directories(${PROJECT_NAME} PRIVATE 3rdparty/scrutiny/inc)

It is possible to enable/disable features when building as so SCRUTINY_SUPPORT_64BITS=0 ./scrutiny-embedded/scripts/build.sh.

Configuration

Basic setup

To get Scrutiny up and running, you need to follow these minimum steps:

  1. Define two buffers for Scrutiny communication
  2. Instantiate a scrutiny::Config and attach these buffers to it
  3. Pass your configuration object to MainHandler::init
  4. Call MainHandler::process in every loop of your main task and pass the time difference since the last call in multiples of 100 nanoseconds
Here's what a basic usage of Scrutiny would look like without data logging or external communication.

//main.cpp
#include <cstdint>
#include "scrutiny.hpp"
 
uint8_t scrutiny_rx_buffer[64];
uint8_t scrutiny_tx_buffer[128];

void main(void){
    scrutiny::Config config;
    config.set_buffers(
        scrutiny_rx_buffer, sizeof(scrutiny_rx_buffer),     // Receive
        scrutiny_tx_buffer, sizeof(scrutiny_tx_buffer)      // Transmit 
        );
    // Additional configuration possible

    scrutiny::MainHandler scrutiny_main;
    scrutiny_main.init(&config);
    
    uint32_t last_timestamp = get_timestamp_microsec();
    while(true){
        uint32_t const timestamp = get_timestamp_microsec();
        // ... 
        // ...

        uint32_t const time_delta = (timestamp-last_timestamp);
        scrutiny_main.process( time_delta*10U );  // Timesteps are multiples of 100ns
        last_timestamp = timestamp;
    }
}
                            

Possible configurations

Let's now look at all the possible optional features and how to configure them.

Display name

This is a simple string that is broadcast when responding to a DISCOVER message sent by the server. This value will be accessible by the server and displayed in the GUI while scanning for devices. It is particularly useful when connecting to a multi-device bus where the devices have a firmware for which the server has no SFD installed
config.display_name = "Drone Controller V4";

Maximum bitrate

It is possible to specify a maximum bitrate to respect on the communication channel. This value is broadcast to the server and the server enforces it, not the device. This can be handy to avoid saturating a shared bus.
config.max_bitrate = 100000; // 100kbps

If unset, the value will default to 0, meaning "no limit"

Session seed

A simple mechanism exists to avoid catastrophic behavior if more than one server tries to connect to a device. Upon connection, the device will generate a 32 bits session ID that will be given to the server and used to keep the session alive. To reduce the risk of collision, a seed can be given. This value should be as random as possible.
config.session_counter_seed = randint();

Forbidden and read-only regions

In many devices, some memory regions are to be avoided or else, a critical component may be affected and a dramatic crash may follow. To avoid such situations, Scrutiny can be instructed to avoid accessing them completely (forbidden) or allow read operation only (read-only). By default, the whole memory is accessible in both read & write.

scrutiny::AddressRange readonly_ranges[] = {
    scrutiny::AddressRange(0x100000, 0x80000000),  // start, stop
    scrutiny::AddressRange(0xC0000000, 0xFFFFFFFF),
    scrutiny::AddressRange(__heap_start, __heap_end)
};

scrutiny::AddressRange forbidden_ranges[] = {
    scrutiny::AddressRange(0, 0xFFFFF),
    scrutiny::tools::make_address_range(some_critical_buffer, sizeof(some_critical_buffer))
};

config.set_readonly_address_range(readonly_ranges, sizeof(readonly_ranges) / sizeof(readonly_ranges[0]));
config.set_forbidden_address_range(forbidden_ranges, sizeof(forbidden_ranges) / sizeof(forbidden_ranges[0]));

The example above defines 3 read-only region and 2 forbidden regions. These restrictions are enforced twice. The device will prevent any unauthorized access by responding to read or write requests with a negative acknowledgment (Nack). To avoid unnecessary communication overhead, these read-only and forbidden regions are communicated to the server during the initial handshake. This ensures that the server avoids sending any read/write requests that will be denied.

The scrutiny::AddressRange structure defines a range with start/stop addresses. The helper scrutiny::tools::make_address_range will define the range with a start and a size.

Finally, note that the write capability can be globally disabled by setting config.memory_write_enable = false;

Runtime Published Values (RPVs)

Reading and writing variables depends on the post-build toolchain capability to discover them using the debug symbols. If you want to expose a variable, but the Scrutiny toolchain fails to find it, you can always fallback on RPVs. These Runtime Published Values, as their name suggest, are defined during the runtime of the embedded application. In other words, they are explicitly defined in C++, identified by a 16 bits ID and communicated to the server during the initial handshake.

RPV are readable and writable by the clients, just like variables. In the device, reading or writing an RPV will trigger a callback that must be implemented by the developer. See the following example.


// In the callbacks, rpv.type is the same value that has been registered in the config.  
// We validate the ID but also the type to future-proof the code.
                            
bool rpv_write_callback(const scrutiny::RuntimePublishedValue rpv, const scrutiny::AnyType *inval){

    if (rpv.id == 0x1000 && rpv.type == scrutiny::VariableType::uint8){
        std::cout <<  "ID 0x1000 Written : " << inval->uint8 << std::endl;
    } else if (rpv.id == 0x1001 && rpv.type == scrutiny::VariableType::sint32){
        std::cout <<  "ID 0x1001 Written : " << inval->sint32 << std::endl;
    } else if (rpv.id == 0x1002 && rpv.type == scrutiny::VariableType::float64){
        std::cout <<  "ID 0x1002 Written : " << inval->float64 << std::endl;
    } else if (rpv.id == 0x1003 && rpv.type == scrutiny::VariableType::boolean){
        std::cout <<  "ID 0x1003 Written : " << inval->boolean << std::endl;
    } else {
        return false;   // failure
    }
    return true;    // success
}

bool rpv_read_callback(scrutiny::RuntimePublishedValue rpv, scrutiny::AnyType *outval){
    if (rpv.id == 0x1000 && rpv.type == scrutiny::VariableType::uint8){
        outval->uint8 = 0x55;
    } else if (rpv.id == 0x1001 && rpv.type == scrutiny::VariableType::sint32){
        outval->sint32 = 0x12345678;
    } else if (rpv.id == 0x1002 && rpv.type == scrutiny::VariableType::float64){
        outval->float64 = 3.1415926;
    } else if (rpv.id == 0x1003 && rpv.type == scrutiny::VariableType::boolean){
        outval->boolean = true;
    } else {
        return false;   // failure
    }
    return true;    // success
}

scrutiny::RuntimePublishedValue rpvs[] = {
    {0x1000, scrutiny::VariableType::uint8},
    {0x1001, scrutiny::VariableType::sint32},
    {0x1002, scrutiny::VariableType::float64},
    {0x1003, scrutiny::VariableType::boolean}
};

// read and/or write callback can be set to nullptr, which will deactivate the specific read or write operation.
config.set_published_values(rpvs, sizeof(rpvs) / sizeof(rpvs[0]), rpv_read_callback, rpv_write_callback);
                            

Connecting the streams

Enabling the scrutiny-embedded library to communicate with the external world is what truly activates Scrutiny in your device. Inside the MainHandler. there are two streams of data: one for incoming data and one for outgoing data. As a developer, your task us to transfer the data from Scrutiny to your physical transceiver, being a UART, SPI bus, CAN bus, IP stack or any other.

Three methods are necessary to do the stream integration, see below.

void MainHandler::receive_data(uint8_t *data, uint16_t len)
Give data coming from the server to the Scrutiny embedded library
uint16_t MainHandler::pop_data(uint8_t *buffer, uint16_t len)
Reads data from the Scrutiny embedded library that must be sent to the server
uint16_t MainHandler::data_to_send(void) const
Tells how much bytes are awaiting to be sent to the server

Additionall, accessing scrutiny::MainHandler::comm() will return a pointer to a CommHandler. This object is responsible to manage the communication with the server. All of its functions are accessible to the user to ease the debugging process of an integration issue, but they should not be used in normal operation.

// Arduino example
void process_scrutiny_loop(){
    static uint32_t last_call_us = 0;
    
    // Compute time difference
    uint32_t current_us = micros(); // Reads microseconds
    uint32_t timestep_us = current_us - last_call_us;
    
    // Receive data
    int16_t c = Serial.read();  // Arduino returns -1 when no data is available
    if (c != -1){
        uint8_t uc = static_cast<uint8_t>(c);
        main_handler.receive_data(&uc, 1);  
    }
    
    main_handler.process(timestep_us * 10); // Timesteps are counted in multiple of 100ns
    
    // Sends data
    uint8_t buffer[16];
    uint16_t nread = main_handler.pop_data(buffer, sizeof(buffer));  // Reads data from scrutiny lib
    if (nread > 0){
        Serial.write(buffer, nread);    // Sends data to the serial port
    }

    last_call_us = current_us;  
}

The size of the data chunk that is read or written does not matter. Whether the bytes come in one by one or in varying packet sizes, Scrutiny will be able to handle it.

Datalogging

Basics

Datalogging is the name of the embedded feature that allows embedded graphs. To enable datalogging in a software, a developer needs to

  1. Dedicate a buffer for data logging storage. The larger the buffer, the longer the data acquisition period
  2. Instantiate and execute a LoopHandler process() method in every loop (task) that can be used for sampling

There are 2 types of LoopHandler : FixedFrequencyLoopHandler and VariableFrequencyLoopHandler. Both are identical except for two differences.

  • No need to pass a timestep at each call to FixedFrequencyLoopHandler::process(). It is inferred by the frequency.
  • FixedFrequencyLoopHandler::process() does not have to use buffer space to store the time. The server can deduce the time axis based on the loop frequency (Ideal time). A VariableFrequencyLoopHandler::process() will not offer the Ideal Time option; only Measured time will be available

The communication between the LoopHandlers and the MainHandler is designed to be thread safe, or let say time-domain safe since they won't necessarily run in an actual thread, but possibly in a baremetal scheduler task.

Configuration

See the following example


#include <cstdint>
#include "scrutiny.hpp"

// Every pointers below will stay valid for the lifetime of the software (not on stack)
uint8_t scrutiny_rx_buffer[64];
uint8_t scrutiny_tx_buffer[128];
uint8_t scrutiny_datalogging_buffer[4096];  // Allow as much as possible
scrutiny::MainHandler scrutiny_main;

// Loop name is maximum 32 chars.
scrutiny::FixedFrequencyLoopHandler task_100hz_lh(100000); // 1e7/100 = 100000.
scrutiny::FixedFrequencyLoopHandler task_10khz_lh(1000);  // 1e7/10e3 = 1000.
scrutiny::VariableFrequencyLoopHandler task_idle_lh("Idle");                 // No frequency
scrutiny::LoopHandler *loops[] = {
    &task_100hz_lh,
    &task_10khz_lh,
    &task_idle_lh
};

void main(void){
    scrutiny::Config config;    // Can be on the stack, will be copied
    config.display_name = "My device";  // Max 64 chars
    config.set_buffers(
        scrutiny_rx_buffer, sizeof(scrutiny_rx_buffer),
        scrutiny_tx_buffer, sizeof(scrutiny_tx_buffer)
        );
    config.set_datalogging_buffers(scrutiny_datalogging_buffer, sizeof(scrutiny_datalogging_buffer));
    config.set_loops(loops, sizeof(loops) / sizeof(loops[0]));
    
    scrutiny_main.init(&config);
    
    run_scheduler();    // Fictive scheduler that runs the tasks below
}

void task_idle(){
    static uint32_t last_timestamp = 0;
    uint32_t const timestamp =  get_timestamp_100ns();
    uint32_t const timestep = timestamp - last_timestamp;

    // Connect the stream here.
    
    scrutiny_main.process(timestep);    // Handles server commands
    task_idle_lh.process(timestep);     // Timestep required for Variable frequency

    last_timestamp = timestamp;
}

void task_100hz(){
    task_100hz_lh.process();    // No timestep required. Fixed frequency
}

void task_10khz(){
    task_10khz_lh.process();    // No timestep required. Fixed frequency
}

The code above will make the GUI display these sampling rates.

Ideal time would be available only for 100Hz and 10kHz sampling rates.

Postbuild toolchain

The post-build toolchain refers to all commands that are called after a binary is generated. As outlined in the introduction page, there are a few Scrutiny tools that must be invoked at this stage.

The SFD file structure

A Scrutiny Firmware Description (SDF) file is a file that contains the debugging symbols of a firmware as well as some additional metadata. This includes the firmware hash (called the firmware ID) used for the identification purpose.

An SFD is nothing more than a .zip archive with the following files inside.

my_firmware.sfd
├── firmwareid
├── varmap.json
├── alias.json
└── metadata.json

  • firmwareid: Contains the firmware hash, in ASCII format
  • varmap.json: Contains a simplified version of the debugging symbol mapping variables having an address and a type to a tree path
  • alias.json: Contains the definition of the aliases that comes with a firmware. These alises are virtual tree nodes that points to an actual variable or a RPV
  • metadata.json: Some optional metadata about the firmware including the software version, the author, generation date. This information will be displayed to the user upon loading of the SFD.

Generating the SFD

The idea is to create an empty folder, our work directory, and generate each file one by one then zip the archive using the scrutiny command line.

#!/bin/bash
mkdir workdir
scrutiny elf2varmap my_firmware.elf --output workdir
scrutiny get-firmware-id my_firmware.elf --output workdir
scrutiny tag-firmware-id my_firmware.elf my_firmware_tagged.elf  # --inplace can replace the output file
scrutiny make-metadata --output workdir --project-name MyProject --version "V1.2.3" --author "ACME inc."
scrutiny add-alias workdir --file alias1.json
scrutiny add-alias workdir --file alias2.json
scrutiny make-sfd workdir my_firmware_v1.2.3.sfd
scrutiny install-sfd my_firmware_v1.2.3.sfd     # To be called on the machine hosting a server

Let's review each of these commands and explain them

  • mkdir workdir
    • Create our work directory which will be passed to each commands
  • scrutiny get-firmware-id my_firmware.elf --output workdir
    • Makes a 128 bits hash of the firmware (the firmware ID) and writes it in "workdir/firmwareid"
    • Omitting the --output option will print the firmware ID to stdout
  • scrutiny tag-firmware-id my_firmware.elf my_firmware_tagged.elf
    • Create a new modified firmware where the firmware ID (128 bits hash) has been injected using a search and replace method
    • The binary can be tagged in place using scrutiny tag-firmware-id my_firmware.elf --inplace
    • If you want to inject the firmware ID with objcopy and a dedicated section instead of a search&replace method, you can skip this command and do the tagging yourself. You can call scrutiny get-firmware-id my_firmware.elf to have the firmware ID printed to stdout
  • scrutiny make-metadata --output workdir --project-name MyProject --version "V1.2.3" --author "ACME inc."
    • Write the metadata to "workdir/metadata.json".
  • scrutiny add-alias workdir --file alias1.json
    • Inject the aliases contained in alias1.json and alias2.json into the work directory. File naming has no importance
    • This command can be called multiple times and will be additive. This allows the aliases to be modular and separated according to what feature they expose. For example, they could be: user_aliases.json, developper_aliases.json, hil_testing_aliases and injected conditionnally on the build configuration.
  • scrutiny make-sfd workdir my_firmware_v1.2.3.sfd
    • Validate the content of the work folder and makes a zip archive of it named "my_firmware_v1.2.3.sfd"
  • scrutiny install-sfd my_firmware_v1.2.3.sfd
    • Install the SFD on a machine meant to host a server. The source file can be deleted afterward, a copy will be made in a local storage, indexed by firmware ID. Upon connection to a device that identifies itselfusing the firmware ID in this .sfd file, the Scrutiny server will automatically load it, making variables and alises visible to all clients.